top of page


Her er en trin-for-trin gennemgang af hvordan jeg laver et knivskæfte med buede indlæg og filework.
Du kan se billeder af de forskellige trin samt en forklaring på hvordan jeg gør.
Klik på pilen til højre for at gå til næste trin.
Du kan se billeder af de forskellige trin samt en forklaring på hvordan jeg gør.
Klik på pilen til højre for at gå til næste trin.

Efter jeg har tegnet kniven op på et stykke papir (se guiden om tegning af knive) udvælger jeg de materialer der skal bruges til kniven. Til denne kniv har jeg valgt dansk masurbirk og stabiliseret poresvamp fra et birketræ.

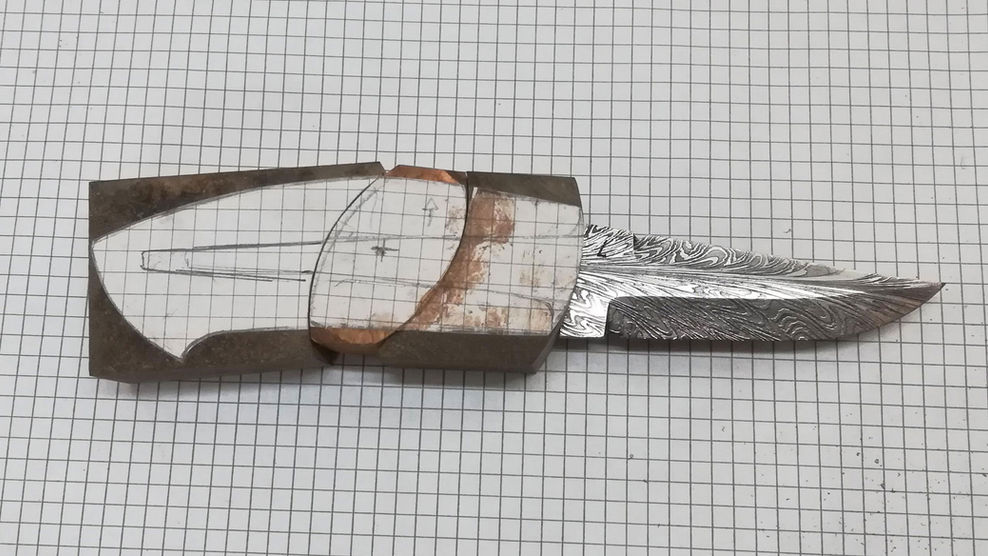
De forskellige dele på kniven, frontholk, indlæg og bagstykket, klippes ud fra tegingen og limes oven på de enkelte stykker.

De enkelte dele skæres nu groft ud på dekupørsaven. Jeg saver en milimeter eller to fra stregen - så er der materiale nok til at finjustere og tilpasse delene.

Alle delene er savet ud og den endelige tilpasning kan gå igang.

Den indvendige kurve laver jeg med en Ø75 mm gummisliber. Jeg har monteret den i søjleboremaskinen med et land der er 100% vinkelret på sliberen. Det er meget vigtigt at vinklerne passer - ellers er det næsten umuligt at tilpasse de forskellige dele.

Den udvendige kurve sliber jeg på tallerkensliberen. Det kan være et langsommeligt arbejde og man skal kun tage en lile del ad gangen.

Hvis man holder de to dele op imod lyset kan man tydeligt se hvor der er luft - og hvor der skal slibes lidt mere.

Så er det bare med at slibe forsigtigt ind til at delene passer 100% sammen. Den mindste luft kan ses når du engang samler kniven.

Alle delene på kniven tilpasses på samme måde.

Nu kan jeg begynde at bore ud til anglen. Jeg markerer midterlinjen og bredden på anglen. Så ved jeg hvor jeg skal bore hulerne.

Til frontstykket bruger jeg et bor der har en mindre diameter en tykkelsen på anglen. På den måde kan jeg tilpasse hullet så der ikke er luft på siderne af klingen.

Jeg borer så mange huller jeg kan ved siden af hinanden -så er det nemmere at fjerne materialet i hullet.

Nu kan jeg file hullet til så det passer med klingens bredde og højde. Det kan godt betale sig at give sig god tid til det - det giver det bedste resultat i den sidste ende. Der skal ikke være luft på siderne af klingen - det kan ses når man limer kniven sammen.

Jeg gør akurat det samme med mellemstykket. Her kan jeg dog godt bruge et lidt større bor.

Hullet i mellemstykket tilpasses også så det passer med anglens bredde og højde. Jo mere nøjagtig man kan være med tilpasningen - jo mindre lim skal man bruge.

Samme fremgangsmåde ved endestykket. Dog borer jeg kun ned så det passer med længden af anglen.

Også her tilpasset hullet efter anglens tykkelse og bredde.

Til sidst passer alle delene sammen...
Man kan vælge at lime hele kniven sammen her - eller man kan, som ved denne knv, vælge at lave nogle indlæg i metal.
Man kan vælge at lime hele kniven sammen her - eller man kan, som ved denne knv, vælge at lave nogle indlæg i metal.

Når man skal lave en kniv med filede indlæg, er det nødvendigt at kunne samle kniven og at kunne skille den ad igen. Derfor svejser jeg en Ø4 mm gevindstang fast på anglen. Samtidig mærker jeg op på bagstykket hvor hullet til gevindstangen skal bores.

Når gevindstangen er svejst fast, sliber jeg den flad på begge sider så den er på tykkelse med anglen. Ellers kan den ikke gå gennem skæftets forskellige dele.

Nu kan jeg bore hullet i bagstykket. Jeg bruger et Ø4,0 mm bor som passer med diameteren på gevindstangen.

De mellemlæg jeg bruger til denne kniv er 1,5 mm tinplader. De klippes ud i firkanter og der afmærkes midten samt bredden på anglen så jeg kan komme til at bore hullerne.

Det er samme fremgangsmåde som ved resten af skæftet. Bor så mange huller som muligt ved siden af hinanden.

Hullet i tinpladen tilpasses så det passer med tykkelsen og bredden på anglen.
bottom of page
